GMass offers a number of ways to personalize the Subject and Message of your email marketing campaigns sent with Gmail. From basic mail-merge style personalization to fallback values and automatic-first-name detection, this guide takes you through all of the options.
Simple Personalization
At the most basic level, you can use {FirstName} and {LastName} to personalize emails if you're sending to email addresses that are your existing Gmail Contacts, meaning people with whom you've had prior email conversations. Your Gmail Contacts contain names along with email addresses.
If you're connecting to a Google Sheets spreadsheet, then you can use any column from the spreadsheet to personalize, like {Company}, {LastPurchase}, or {DateOfBirth} for example, assuming that your spreadsheet contains the columns Company, LastPurchase, and DateOfBirth.
You can use these simple personalization variables in the Subject and Message. GMass gives you one-click buttons in the Settings panel to insert personalization variables.
Note that the buttons will only insert the personalization variables into the Message, but you can copy/paste them into the Subject too.
Fallback Values
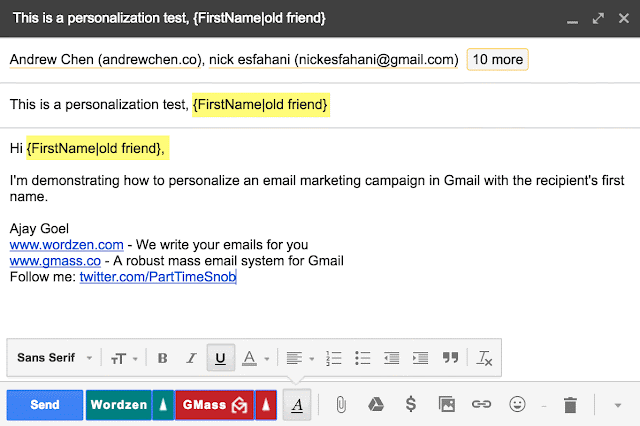
If you know that your personalization variables will have a value for some email addresses but won't for others, you can set a fallback value to be used when the personalization value is blank. For example, you could use {FirstName|Friend} in your message. If a "FirstName" is available, it will be substituted; otherwise "Friend" will be substituted. You can use the fallback value syntax, a pipe symbol, followed by the fallback value, with any personalization variable.
Google Sheets vs No Google Sheets
If you're connecting to a Google Sheets spreadsheet, then you'll get separate personalization buttons in the GMass Settings Box, one button corresponding to each column in your spreadsheet. If you are not connecting to a spreadsheet, then you'll just get the standard FirstName, LastName, EmailAddress personalization buttons, where the values correspond to the email addresses and names of your Gmail Contacts.
Multi-word Names
Sometimes the names associated with your Gmail Contacts have not just two words, but three or four words. This is especially common in East Asian cultures. Therefore, in addition to FirstName and LastName, which will use the first word of the name and the last word of the name, you can instead use the syntax {Name1}, {Name2}, {Name3}, and {Name4}. Name1 corresponds to the first word in the name, Name2 to the second word, and so on.
For example, if you are sending to a Gmail Contact that looks like:
<loh@twitter.com> "Loh Kin Poh"
Asian convention dictates that you address someone by all three words of the name, so in this case you would use:
Dear {Name1} {Name2} {Name3}:
at the beginning of your message.
Auto First Name Detection
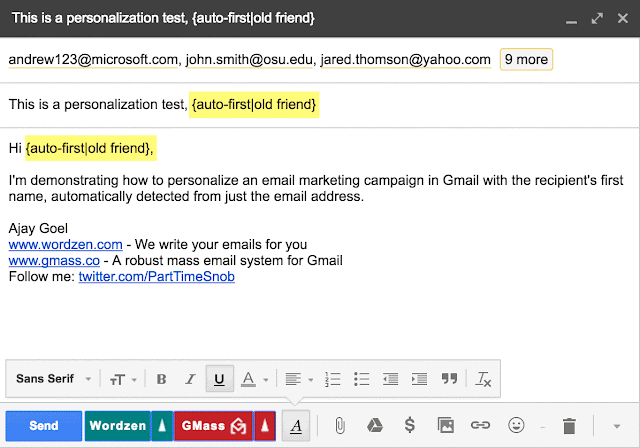
GMass has developed an algorithm that can accurately auto-detect someone's first name just from their email address. To insert the auto-detected first name, use the syntax {auto-first}. Again, you can use this syntax in the Subject and Message. In the below example we auto detect the first name and use a fallback value of "old friend" in cases where the first name cannot be detected.
Combining techniques
You can use personalization values along with auto first name detection and fallback values. For example, let's say you're using a spreadsheet with these columns:
FirstName
LastName
Email
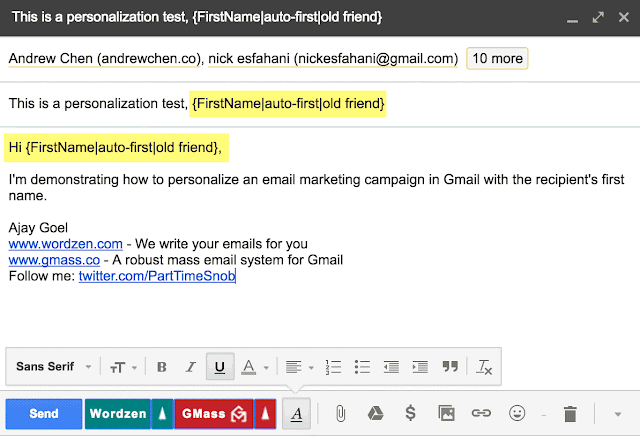
Some of the FirstName values are blank. So for those, you want GMass to auto detect the first name. And in cases where GMass cannot auto detect the first name, you want to use "old friend". In that case, the syntax would look like:
Hi {FirstName|auto-first|old friend}:
The personalization tokens are tried in order they are placed inside the curly brackets. Fallback values should be separated by the pipe symbol ( | ).
Testing Personalization
It's easy to make sure your personalization is working before you send your email to all of your recipients. You can use the Send Test Email button to send a test email to yourself or anyone else. Then just check your Inbox, or your Sent Mail Folder, to make sure the test email looked the way you expect.
You can also choose to create Drafts first instead of sending the mass email. That allows you to spot check all of Drafts, one for each recipient, and then if the personalization in the Drafts looks the way you expect, you can click a link to send all the Drafts.
Simple Personalization
At the most basic level, you can use {FirstName} and {LastName} to personalize emails if you're sending to email addresses that are your existing Gmail Contacts, meaning people with whom you've had prior email conversations. Your Gmail Contacts contain names along with email addresses.
If you're connecting to a Google Sheets spreadsheet, then you can use any column from the spreadsheet to personalize, like {Company}, {LastPurchase}, or {DateOfBirth} for example, assuming that your spreadsheet contains the columns Company, LastPurchase, and DateOfBirth.
You can use these simple personalization variables in the Subject and Message. GMass gives you one-click buttons in the Settings panel to insert personalization variables.
Note that the buttons will only insert the personalization variables into the Message, but you can copy/paste them into the Subject too.
Fallback Values
If you know that your personalization variables will have a value for some email addresses but won't for others, you can set a fallback value to be used when the personalization value is blank. For example, you could use {FirstName|Friend} in your message. If a "FirstName" is available, it will be substituted; otherwise "Friend" will be substituted. You can use the fallback value syntax, a pipe symbol, followed by the fallback value, with any personalization variable.
Google Sheets vs No Google Sheets
If you're connecting to a Google Sheets spreadsheet, then you'll get separate personalization buttons in the GMass Settings Box, one button corresponding to each column in your spreadsheet. If you are not connecting to a spreadsheet, then you'll just get the standard FirstName, LastName, EmailAddress personalization buttons, where the values correspond to the email addresses and names of your Gmail Contacts.
Multi-word Names
Sometimes the names associated with your Gmail Contacts have not just two words, but three or four words. This is especially common in East Asian cultures. Therefore, in addition to FirstName and LastName, which will use the first word of the name and the last word of the name, you can instead use the syntax {Name1}, {Name2}, {Name3}, and {Name4}. Name1 corresponds to the first word in the name, Name2 to the second word, and so on.
For example, if you are sending to a Gmail Contact that looks like:
<loh@twitter.com> "Loh Kin Poh"
Asian convention dictates that you address someone by all three words of the name, so in this case you would use:
Dear {Name1} {Name2} {Name3}:
at the beginning of your message.
Auto First Name Detection
GMass has developed an algorithm that can accurately auto-detect someone's first name just from their email address. To insert the auto-detected first name, use the syntax {auto-first}. Again, you can use this syntax in the Subject and Message. In the below example we auto detect the first name and use a fallback value of "old friend" in cases where the first name cannot be detected.
Combining techniques
You can use personalization values along with auto first name detection and fallback values. For example, let's say you're using a spreadsheet with these columns:
FirstName
LastName
Some of the FirstName values are blank. So for those, you want GMass to auto detect the first name. And in cases where GMass cannot auto detect the first name, you want to use "old friend". In that case, the syntax would look like:
Hi {FirstName|auto-first|old friend}:
The personalization tokens are tried in order they are placed inside the curly brackets. Fallback values should be separated by the pipe symbol ( | ).
Testing Personalization
It's easy to make sure your personalization is working before you send your email to all of your recipients. You can use the Send Test Email button to send a test email to yourself or anyone else. Then just check your Inbox, or your Sent Mail Folder, to make sure the test email looked the way you expect.
You can also choose to create Drafts first instead of sending the mass email. That allows you to spot check all of Drafts, one for each recipient, and then if the personalization in the Drafts looks the way you expect, you can click a link to send all the Drafts.


